Speed Tree FBX to Unreal Engine
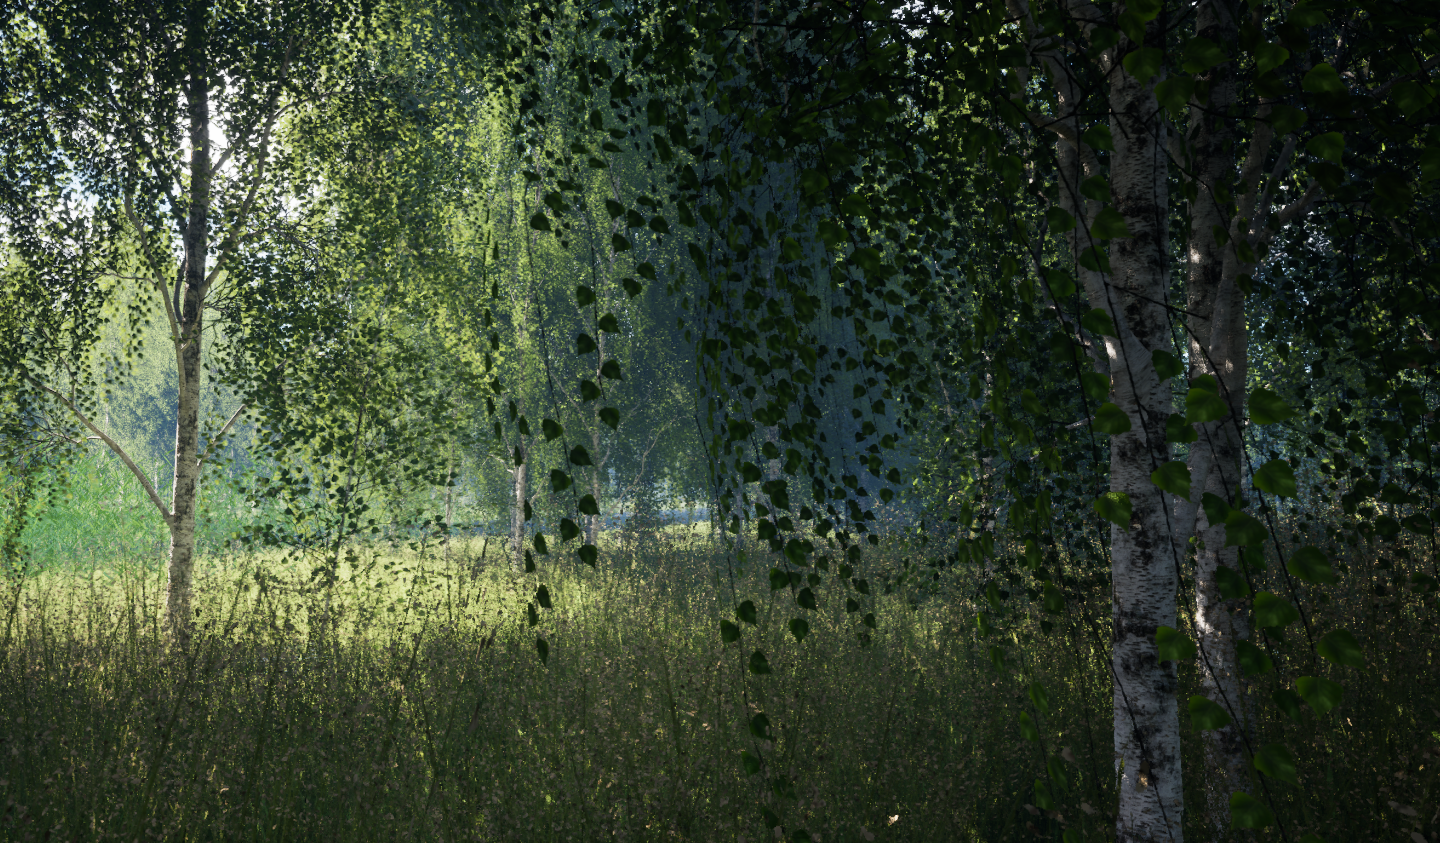 Screenshot from a WIP Unreal Engine environment
I have recently started learning and working with the well known Speed Tree Modeller to create my own plant and tree assets for environments that I intend to publish on Unreals Fab and Unity Asset store. I have always liked the idea of creating natural “lush” environments but as always with some things in life, I just have not really gotten around to seriously doing it. Until now :D
TLDR
I have created a python script to reformat the FBX files exported from Speed Tree Modeller so they would be compatible with Unreal Engine static mesh import logic.
Here is the script / application: fbxprep.7z
Outline
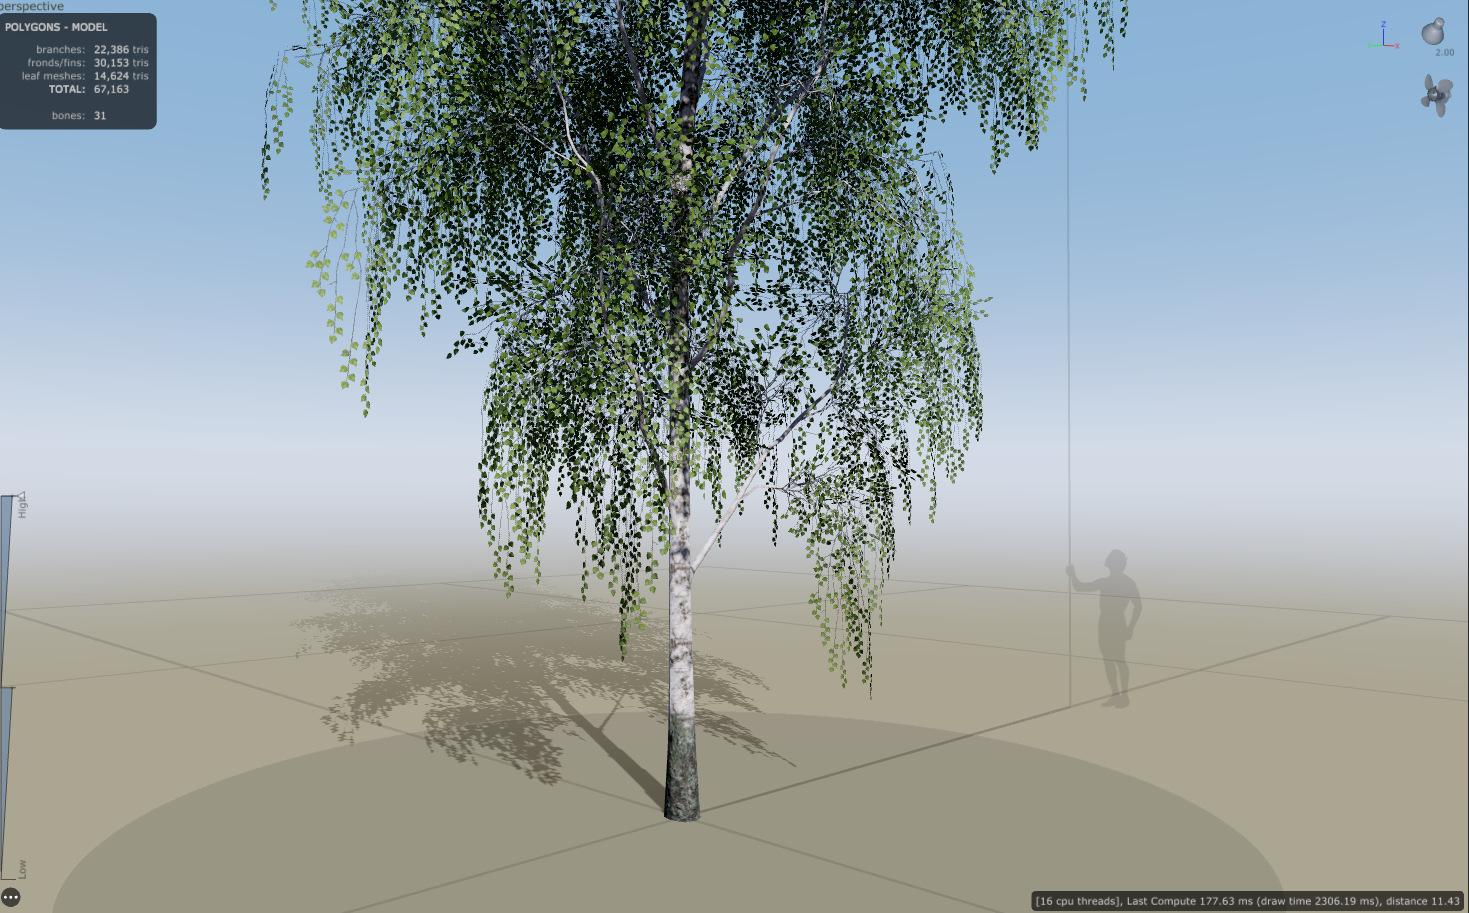 Screenshot of a game-ready birch tree model in Speed Tree Modeller
It has been a few months now with using Speed Tree Modeller to create fbx assets that I use in Unity and Unreal Engine with my own wind animation vertex shaders to create some dynamic looking environments.
My creative process usually involves extremely frequent iteration, so the process of exporting the fbx file and textures from the Speed Tree Modeller and the modifying it to suit the Unreal Engine static mesh importing logic started to grind my gears. I found myself doing the same same steps in Blender over and over to “format” the fbx into the specific format that was needed by Unreal Engine to import the LOD levels with the least effort many times per evening.
For the first weeks I felt like it was such a small problem that it would not be worth dedicating hours to come up with some script solution to solve it. But after about 5 weeks i felt fed up.
By the way, my day job at FrostFilms VFX studio is literally mostly coming up with solutions to automate these type of things. So I felt compelled to finally solve this personal irk.
Requirements
The steps that needed to be scripted were very clear for me. The Blender script would have to:
- Import the given FBX file.
- Apply all transforms of the scene objects
- Add the custom attribute to the root. (fbx_type=LodGroup)
- Shorten the final LOD obj name
- Export a new FBX with specific options
Im very comfortable with using the commandiline terminal to get things done but when working with 3D models I find that my brain gets into a “Mouse Mode” and opening up a terminal to write some commands feels really tedious at that point. That’s why the solution also had to have a GUI.
Blender Python API Script
The steps outlined before are very straight forward to implement in a Blender python script. There are some things to consider however as the script will be launched from outside the Blender GUI. So the input and output file paths need to be passed in from outside:
# start of the Blender API python script
import sys

argv = sys.argv
argv = argv[argv.index("--") + 1:] # only keep args after "--"

if len(argv) < 2:
    print("Usage: blender --background --python script.py -- input.fbx output.fbx")
    sys.exit(1)

input_fbx = argv[0] # path to the input fbx file
output_fbx = argv[1] # path to the output fbx file
This means the Blender executable needs to be executed with a commandline like:
path/to/blender.exe --background --python path/to/script.py -- path/to/input.fbx path/to/output.fbx
Next step is to make sure that the blender scene itself is empty before importing the fbx file:
bpy.ops.wm.read_factory_settings(use_empty=True)
bpy.ops.import_scene.fbx(filepath=input_fbx)
You have already made an empty blender scene to be the default when opening up Blender if you are somebody who’s seriously using it, but still it is good practise to enforce known starting conditions in automation scripts. Especially when the scripts will be executed in Third Party Software. Otherwise the stock default Light and Camera objects will be part of the exported FBX scene which would cause all sorts of problems down the line…
Before everything else I created a function that applies the transforms for any given object. This is a convenience function that will be called for each object in the scene.
def apply_transform(obj):
    # making sure the target obj is only one selected and active
    bpy.ops.object.select_all(action='DESELECT')
    obj.select_set(True)
    bpy.context.view_layer.objects.active = obj

    # making the transform "identity" / "0"
    bpy.ops.object.transform_apply(location=True, rotation=True, scale=True)
Game engine assets need to have an “identity” or “0” transforms on them. This way it’s more straight forward to use them in the engine.
It’s best to start with the “root” object of the scene. This object will need the “fbx_type=LodGroup” property and its transforms will should be applied first. Otherwise the children would inherit the transforms.
root_obj = None

for o in bpy.data.objects:
    if o.parent == None:
        # root obj will not have any parent
        root_obj = o
        break

if root_obj != None:
    print("starting to prep obj: %s" % (root_obj.name))

    # adding special LodGroup fbx_type property
    # so lods are imported by Unreal Engine properly
    root_obj["fbx_type"] = "LodGroup"

    # zero-ing the transform of the root obj first
    apply_transform(root_obj)
else:
    print("Could not find root object?") # very unusual, mabye empty fbx scene
    sys.exit(1)
Note the else statetement at the end. It’s always good idea to have meaningful error prints especially when dealing with 3rd party software runtime. This will save soooo much time in the future if something unexpected comes up. I know it’s tedious to write all the if else and print statements in a larger scale script/program but I have found it useful every single time without exeption.
The child objects are next. Speed Tree Modeller FBX scenes usually have the structure like this:
- root_obj
- LOD0
- LOD1
- LOD2
- root_obj_Billboard_LOD3
It’s better to have all the LOD objects be with same naming convention, so my script will rename the billboard obj to match the other objects. In this example the root_obj_Billboard_LOD3 would become just LOD3.
    for child in root_obj.children:
        print("\thandling child:", child.name)

        # fixing billboard lod name
        # just leaving the last 4 chars
        if len(child.name) > 4:
            child.name = child.name[-4:]

        # zero-ing the child transform
        apply_transform(child)
Now the scene is ready for export from Blender. Exporting a blender scene is fortunately really easy via the python API:
bpy.ops.export_scene.fbx(
    filepath=output_fbx,
    bake_space_transform=True, # preserves the 0 transform
    mesh_smooth_type="FACE",   # might vary by usecase
    use_custom_props=True,     # writes the "fbx_type=LodGroup" prop
    path_mode="COPY"           # copies textures to the target file
)
Thats it regarding the blender python API scripting.
TkInter GUI
I needed the script solution to also have a GUI I could click through when being in the “Mouse Mode”.
Simplest way to create a GUI for a python script is using the TkInter module which is usually included in all python installations.
If you are someone who has experience with writing GUI applications in any language / context you will know that even the most trivial seeming GUI layouts will take unexpectedly large amounts of coding to accomplish.
This script solution is no different. At the time of writing this article, the gui that only has 2 file directory input fields and 1 button still takes around 130 lines of python to create.
GUI Layout
Building a GUI with TkInter in Python is easy but will get really verbose fast. But let’s start with the basics at first. The root window will need to be defined and started first to get an empty window to display:
import tkinter as tk

root = tk.Tk()
root.geometry("600x120")

# build the widget tree HERE before entering
# mainloop

root.mainloop()
This is the most minimal code that creates a GUI window with python.
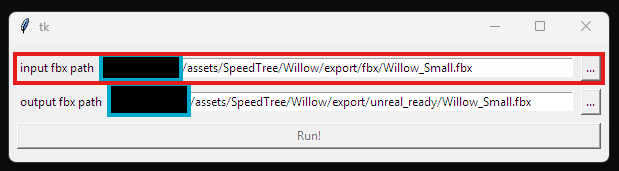
As mentioned there are 2 input fields for filepaths: Input FBX file and Output FBX path. And 1 button to launch the blender process which will actually apply the modifications to the file and export the new file.
- gui root window
- input filepath
- label
- text entry
- browse button
- output filepath
- label
- text entry
- browse button
- run button
- input filepath
The filepath fields have a lot in common, so I created a subclass of tk.Frame that I could use for both of the fields.
class PathParam(tk.Frame):
    def __init__(self, parent:tk.Widget, label:str, is_save_file:bool, on_change_callback, *args, **kwargs):
        super().__init__(parent, *args, **kwargs)
        self.var_path:tk.StringVar = tk.StringVar(self, "")
        self.on_change_callback = on_change_callback

        self.label:tk.Label = tk.Label(self, text=label)
        self.btn:tk.Button = tk.Button(self, text="...", command=self.set_path)
        self.text:tk.Entry = tk.Entry(self, textvariable=self.var_path)

        self.is_save_file:bool = is_save_file # whether to use the askopenfilename or asksaveasfilename function

        self.label.pack(side='left', padx=4)
        self.text.pack(side='left', expand=1, fill='x', padx=4)
        self.btn.pack(side='right', padx=4)

    def set_path(self):
        if self.is_save_file:
            selected_filepath = filedialog.asksaveasfilename(
                title="Select existing fbx file to use",
                filetypes=dialog_filetypes
            )
            if selected_filepath != "":
                self.var_path.set(selected_filepath)
                self.on_change_callback()
        else:
            selected_filepath = filedialog.askopenfilename(
                title="Select output fbx file location",
                filetypes=dialog_filetypes
            )
            if selected_filepath != "":
                self.var_path.set(selected_filepath)
                self.on_change_callback()
            else:
                print("invalid file path selected")
This class wraps the widgets to create the familiar file location selection GUI with a label, a text field and a browse button highlighted with the red box:
Next I created a class that will act as a “master” for the whole GUI application. It will hold the state and dispatch the blender process eventually:
class FBXUI(tk.Frame):
    def __init__(self, parent, *args, **kwargs):
        super().__init__(parent, *args, **kwargs)

        self.input_file_path = PathParam(self, "input fbx path", False, self.validate)
        self.output_file_path = PathParam(self, "output fbx path", True, self.validate)

        self.input_file_path.pack(side='top', expand=1, fill='x', pady=4)
        self.output_file_path.pack(side='top', expand=1, fill='x', pady=4)

        self.btn_run = tk.Button(self, text="Run!", command=self.run)
        self.btn_run.config(state=tk.DISABLED)
        self.btn_run.pack(side="bottom", expand=1, fill='x', padx=4, pady=4)

        self.load_settings()

    def load_settings(self):
        if os.path.exists(SETTINGS_FILE):
            with open(SETTINGS_FILE, "r") as f:
                data = json.load(f)
                print(data)
                if "input_path" in data.keys():
                    self.input_file_path.var_path.set(data["input_path"])
                if "output_path" in data.keys():
                    self.output_file_path.var_path.set(data["output_path"])

    def save_settings(self):
        with open(SETTINGS_FILE, "w") as f:
            json.dump(
                {
                    "input_path": self.input_file_path.var_path.get(),
                    "output_path": self.output_file_path.var_path.get()
                },
                f
            )

    def validate(self):
        if self.input_file_path.var_path.get() != "" and self.output_file_path.var_path.get() != "":
            self.btn_run.config(state=tk.NORMAL)
        else:
            self.btn_run.config(state=tk.DISABLED)

    def run(self):
        # building the commandline for the blender process
        cmd = ' '.join([
            "\"%s\"" % (blender_path),
            "--background",
            "--python",
            "\"%s\"" % (blender_script_path),
            "--",
            "\"%s\"" % (self.input_file_path.var_path.get()),
            "\"%s\"" % (self.output_file_path.var_path.get())
        ])
        print("running command:\n\t"+cmd)

        process = subprocess.Popen(
            cmd,
            stdout=sys.stdout,
            stderr=sys.stderr
        )

        process.wait()

        print("\nFbx Preparation is Done!\n")
You’ll notice that there are functions related to saving and loading there. This enables the program to store and load the last used filepaths. It might seem an insignificant feature but it makes a huge difference when using the application multiple times a day often on the same file paths.
Launch Script
I used a simple .bat script to make this application launchable with simple double click. It has only one line:
cmd /c "python %CD%\fbxprepui.py"
Environment
As it’s a simplistic utility application mainly for my personal use there are a few assumptions about the os environment for this to work:
- modern python installed and in path
- blender 4.5 installed at the default location
Not a lot, but still some things to keep in mind if you would like to try this thing out.
Result
The application consists of 3 files:
 - fbxprep.bat  (launching script)
 - fbxprepui.py (TkInter GUI)
 - fbxprep.py   (Blender runtime script)
Here is the full script: fbxprep.7z
It might seem overkill to build a GUI application to handle some minor changes inside a fbx scene but these kinds of small simple tasks are the ones that will slow you down and cause frustration if needed to be done multiple times in an hour.
So it might take a few hours to dial in the scripts and GUI application but the time spent is worth it in the long run. And if you are someone afflicted with this same very specific problem you won’t even have to build this application!
Check out my Unity Assets as a thank you ;D